
Nail trims are one of those grooming tasks that owners either handle confidently at home or avoid entirely out of fear of hurting their pet. Both dogs and cats can be trimmed safely at home with the right approach — the key is going slowly, knowing what you’re looking for, and knowing when to hand it off to a professional instead.
Why Regular Nail Trims Matter
Overly long nails can change how a dog or cat walks, catch on carpet and furniture, and in some cases curl back into the paw pad. Keeping up with a regular trim schedule is one of the simpler, lower-stakes parts of an at-home grooming routine, alongside brushing and the occasional bath.
What You Need
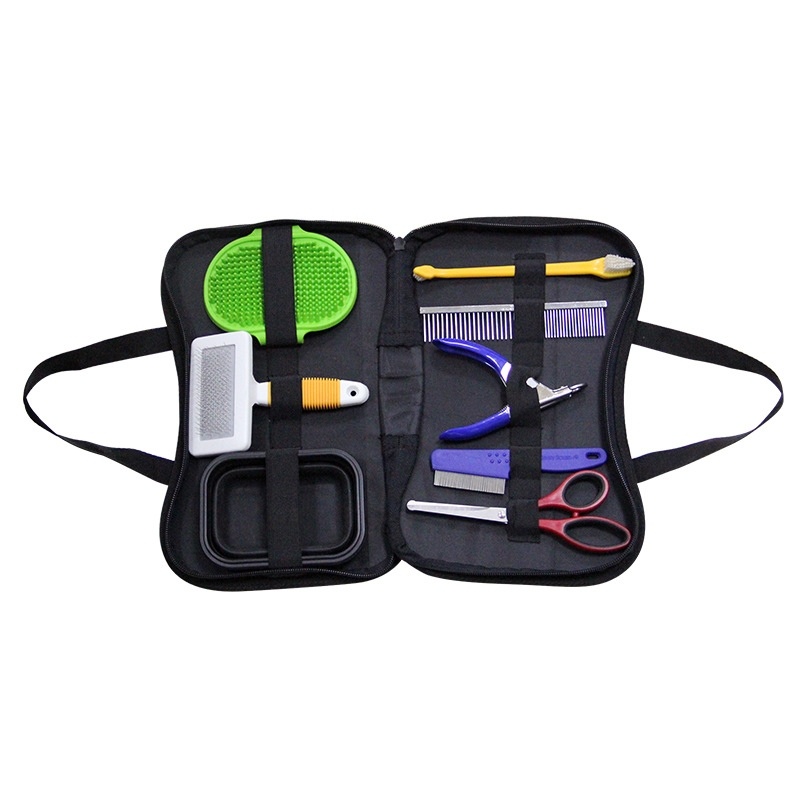
Our pet grooming tool set ($48.99), made from PU and stainless steel, covers nail trimming alongside the other basics like ear and coat finishing work, so you’re not buying single-purpose tools for occasional use. It’s listed for both cats and dogs in our catalog, though as with any clipper, go slower and use smaller, more frequent trims on a cat’s narrower nails. Keeping a styptic powder or cornstarch on hand (available at most pharmacies or pet supply stores) is worth doing before your first trim, in case you nick the quick.
Getting Your Pet Comfortable With Handling First
Before the clippers even come out, spend a few short sessions just holding and gently pressing on your pet’s paws, rewarding calm behavior. A pet that’s used to having their paws touched will make the actual trimming far less stressful for both of you. This matters especially for cats, who are often more sensitive about paw handling than dogs.
How to Find the Quick
The “quick” is the blood vessel and nerve inside the nail. On light or clear nails, it’s usually visible as a pinkish area you can see through the nail — the goal is to trim just before it starts. On dark nails, the quick isn’t visible, which means trimming in small increments is safer than guessing. Watch the cut cross-section: once you see a small grey or pink dot appear in the center, stop — that means you’re close.
Step-by-Step Trimming Process
- Choose a calm moment, ideally after playtime or a walk when your pet is a little more settled.
- Hold the paw gently but securely, pressing lightly on the toe pad to extend the nail.
- Identify the quick using the light-vs-dark method above.
- Trim a small amount at a time rather than one large cut, especially on darker nails.
- Stop as soon as you see the early cross-section change described above.
- Reward with a treat or praise after each paw, not just at the end, to keep the experience positive throughout.
Dogs vs. Cats: What’s Different
Dog nails are generally thicker and require more consistent pressure to cut cleanly, while cat nails are thinner, more curved, and often easier to over-cut if you’re not paying attention to the smaller quick. Cats can also retract their claws, so gently pressing the paw pad to extend the nail fully before trimming is an extra step dogs don’t need. Most cats also tolerate shorter sessions better — two or three nails at a time is often more realistic than doing all of them in one sitting.
How Often Is Enough
Most dogs and cats need a trim every three to four weeks, though this varies with activity level — dogs that walk regularly on pavement naturally wear their nails down faster and may need trims less often. A simple guide: if you can hear nails clicking on hard floors, it’s time.
If You Accidentally Cut the Quick
It happens even to experienced owners, and it looks more alarming than it usually is. Apply light pressure with a clean cloth and, if you have it, a small amount of styptic powder or cornstarch to help the bleeding stop. It typically resolves within a few minutes. If bleeding doesn’t slow down after several minutes of steady pressure, contact your vet.
When to Let a Groomer or Vet Handle It Instead
If your pet is extremely anxious, has very dark nails you can’t read confidently, or nails that have grown long enough to curl, a groomer or vet visit is the safer option rather than risking repeated stressful attempts at home. There’s no downside to outsourcing this one task while you handle the rest of your grooming routine yourself.
Frequently Asked Questions
My dog or cat won’t sit still at all for a trim. What should I do?
Break it into very short sessions — even one nail at a time counts as progress — and build up gradually rather than trying to finish all of them in one sitting.
Are nail grinders better than clippers?
Grinders can give a smoother result and let you stop gradually as you approach the quick, but they take longer and some pets are more bothered by the vibration and sound than by clippers. Either tool works well once your pet is comfortable with it.
Can I use human nail clippers?
It’s better to use clippers designed for pets. Human clippers aren’t shaped for a nail’s curve and can cause splitting or an uneven cut.
How do I know if nails are already too long?
If they touch the ground and click audibly when your pet walks on a hard floor, or you notice their stance changing, they’re overdue for a trim.
[…] For most pets, trimming just the tip of the nail every couple of weeks is manageable at home. If you’re unsure where to cut, your pet has dark nails you can’t see through, or a previous trim caused bleeding, it’s safer to have a groomer or vet handle it. For the full step-by-step process, see our nail trimming guide. […]
[…] or two nails counts as real progress — rather than trying to finish all of them at once. Our nail trimming guide covers this in more depth, including when it’s worth handing the task to a groomer or vet […]
[…] Covers nails, coat, and finishing touches in one set — see our nail trimming guide […]
[…] need to scratch — a cat with perfectly trimmed nails will still want to scratch something. Our step-by-step nail trimming guide covers how to make trims a low-stress […]